
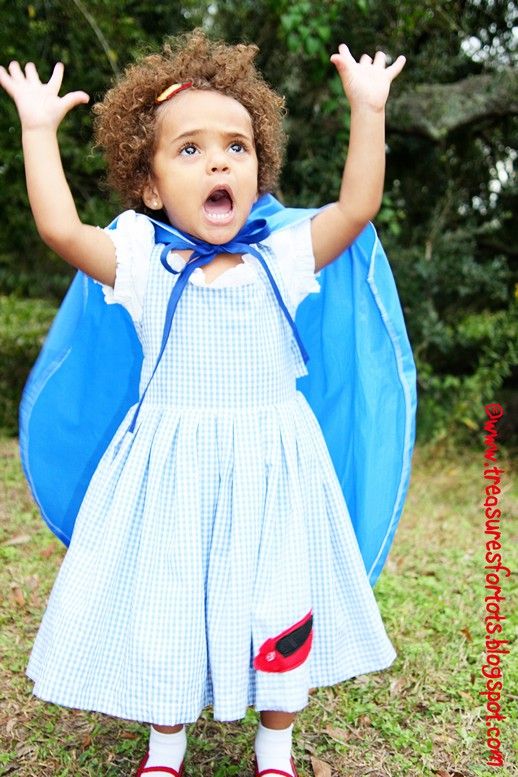
 I think she's summoning lightning!
Serenity is having a Princess-themed birthday party this year, but little boys will be coming too.
I've been getting stuff together so they can dress up as Knights. I'm looking for materials that are fairly low-cost and very simple to make and/or sew.
Two things I definitely wanted to make for the Knights are the capes and shields.
I might end up doing armor, but I don't know yet.
I thought about making the swords too, but I found some really cool-looking ones at Wal-Mart for only $4.
A couple of days ago I saw some Greige cloth at Hobby Lobby on sale for $2/yard.
A couple of days ago I saw some Greige cloth at Hobby Lobby on sale for $2/yard.
They were very bright boyie colors too - orange, blue, and green.
The first thing I thought of was: Knight's capes! I'm not even sure what kind of material it is - but it's shiny!
Shiny is perfect for a Knight's cape!
The first thing I thought of was: Knight's capes! I'm not even sure what kind of material it is - but it's shiny!
Shiny is perfect for a Knight's cape!
So tonight I'm looking over some of the Superhero cape tutorials I have bookmarked and they're all really cute, but not quite what I'm looking for - I want to be able to sew it quick, ya know?
So taking stock of everything I've read, I whipped up a cape that is extremely simple to sew and can be used for whatever your child can imagine!
Materials needed:
1/2 yard of fabric
45" of bias tape
thread
scissors
cape pattern (download here)
1) Print and cut out the pattern.
Be sure to your printer is set to: Page scaling: NONE and CHECK the little box next to: Choose paper source by PDF page size.
Tape the pages together. Don't overlap them!
You'll need to extend the pattern lines out just a little with a pen or marker.
Here's the pattern all taped and cut out:

2) Pin the pattern on the fold of the material, and cut out the cape.
3) Roll-hem all the edges with a serger. If you don't have a serger, you can do a double-turn hem, or zig-zag stitch on the raw edges.
You could put bias tape around the entire cape too, but that can get expensive if you're making more than one.
You could put bias tape around the entire cape too, but that can get expensive if you're making more than one.
Or if you're using knit, fleece or some other cloth that doesn't fray much, don't worry about sewing around the edges.
4) Fold the bias tape in half to determine the center, then pin it to the center of the neckline on the cape, now finish pinning the rest of the tape to the cape.
4) Fold the bias tape in half to determine the center, then pin it to the center of the neckline on the cape, now finish pinning the rest of the tape to the cape.
You're gonna have two long pieces that extend out past the cape - they will be your ties.
5) Sew the bias tape, make sure to back stitch at the beginning and end.
All done! See how easy that was?! And the total cost? Around $1!
5) Sew the bias tape, make sure to back stitch at the beginning and end.
All done! See how easy that was?! And the total cost? Around $1!
Wow!
If you're making them for party favors, like I am, use a several colors of bias tape to create a different color combo for each cape.
That way the boys will know exactly which cape is his!

Look at my Darling Stinker go! She was really getting into her Superhero mode!
She was saying, "I have ZOOM power!"
Funny!


POST-IT-NOTE: Here's a list of some great cape tutorials:
Reversible Girl's Superhero Cape
She was saying, "I have ZOOM power!"
Funny!

POST-IT-NOTE: Here's a list of some great cape tutorials:
Reversible Girl's Superhero Cape
Super Easy Superhero Cape 2
How to Make a Cape: A Tutorial
Cape Tutorial
Tutorial for a Superhero Cape
Superhero Mask and Cape Tutorial
The Six-Minute Superhero Cape
A Thrifty Superhero Cape
Tutorial: Super Cape!
Clever Little Cape
Kids Saint Cape Tutorial
Make a Superhero/Wizard Cape!
EASY Knit Superhero Cape and Mask
Have fun!


8 comments:
Fun! My kids would love it. I can't believe it only cost a dollar to make! Love Serenity's dorothy dress too!
I know a child that was killed because a cape was tied around his neck. Please use velcro or ripper snaps, please. ; )
Your daughter is darling. Love the cute cape, btw.
Awesome! Adorable little miss as well. I am planning on making my two older kids capes (the ones that can walk). I had gotten so far as making a pattern off of my son's measurements but I like the little scalop at the top you added. Very good addition. Now if I could just get to the sewing room!
I've just returned to sewing after many years away, and my skills are rusty. This pattern was simple to print, to scale, easy to follow, and accessible for a newbie! I used ribbon for edging, rather than bias tape. Thank you for a simple pattern that even a beginner can make look professional. So fun!
Thanks for the link love!
Jenny @ The Southern Institute
Thanks for the mention!! My son is obsessed with all thing super hero right now!! I'll put your button on my blog!
I used your tutorial to make a cape for my son's 3rd b-day party and he loved it! Thanks very much for sharing.
Post a Comment