

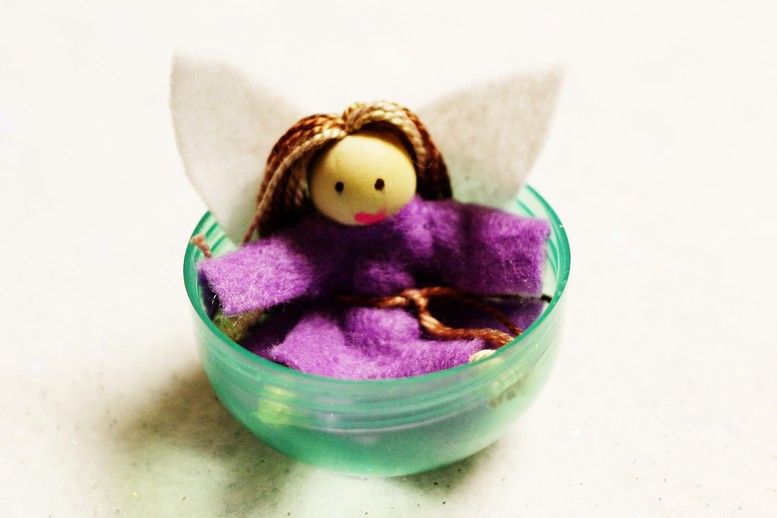
I've been trying to figure out what I'm going to put in the Bug Catcher necklaces, when I thought how sweet a tiny fairy would look - Fairy Catchers!
Of course you couldn't keep her locked up - she likes to come out to play too!
Hmmm... maybe I should call it something else?
A fairy bubble?
Anyways....
Hmmm... maybe I should call it something else?
A fairy bubble?
Anyways....
I started trawling the 'net for something cute, fairly easy and pretty cheap to make.
I came across these Pipe Cleaner Dolls and Little Sister Handmade's peg Little Fairy Tutorial.
I incorporated both ideas to make my posable tiny little fairy dolls that are small enough to fit into those gumball capsules I bought from Variation.
Emily's (Little Sister Handmade) tutorial was great!
She shows how to wrap a pipe cleaner to make arms for her cute little peg fairies, and I just used that technique to wrap the fairy's entire body.
I have no idea if I'm doing it the "right" way or not, but it works for me so I'm satisfied!
Emily learned from the book Felt Wee Folk.
How cool! I want that book!
Maybe I can learn even more about making tiny people!
If you're reading this Emily, thank you so much for the link to Felt Wee Folk!
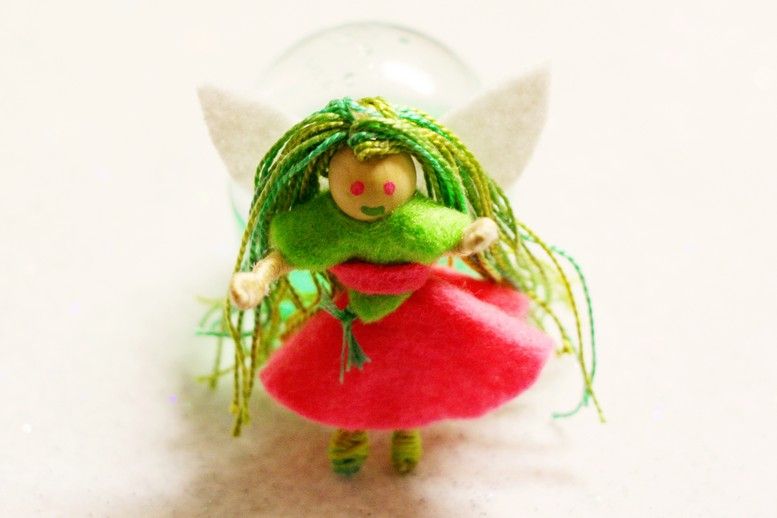
You can get really elaborate with these dolls and embroidery cute designs on their dresses and wings, add buttons, or tiny flowers - the possibilities are endless!
But mine are pretty plain - I'm still trying to get the wrapping technique down pat!
You could probably make one doll in about 30 minutes or so - but once you got the hang of it I'm sure it would take even less time.
POST-IT-NOTE:
My fairies' dresses and wings are based on the one offered by Little Sister Handmade.
I've modified them to fit my tiny dolls.
Materials:
1 6mm pipe cleaner
1 9/16" wooden bead
1 skein embroidery floss (I used #738)
1 skein needlepoint thread (I used size 5 #4124)
paint or paint pens (for the eyes and mouth)
fairy dress and wings template (download here)
needle & white thread
1 piece of felt (for the dress)
1 piece of white glitter felt (for the wings)
hot glue (or felt glue)
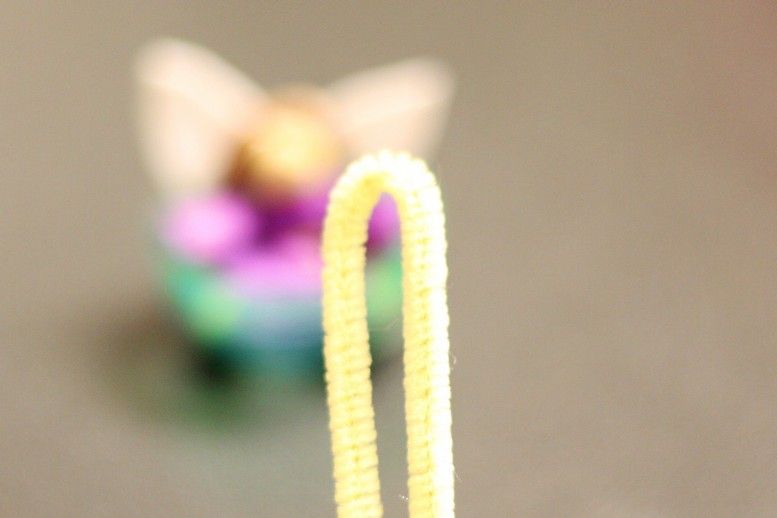
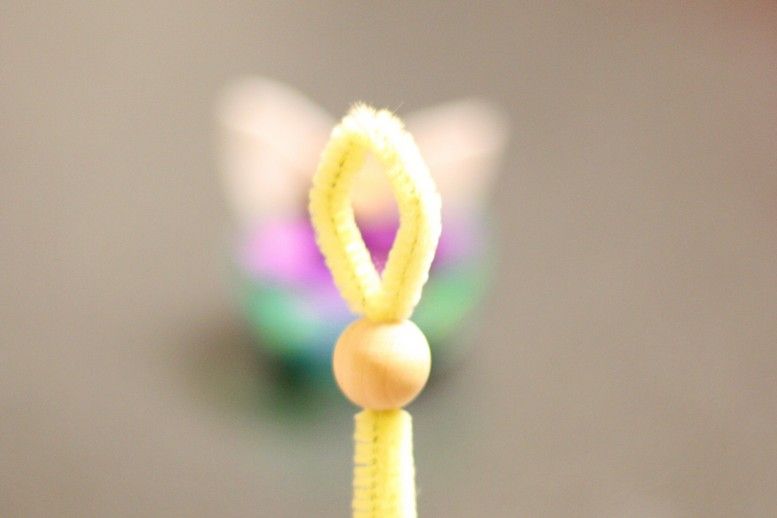
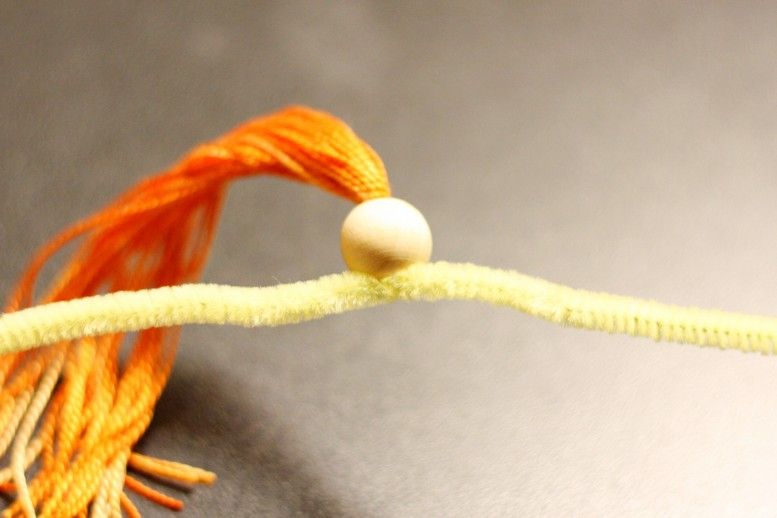
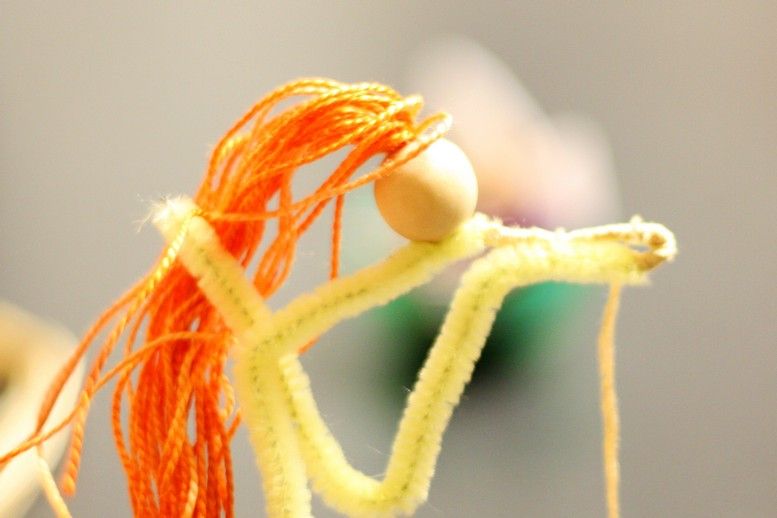
Fold the pipe cleaner in half.

Thread the wooden bead on the pipe cleaner, leaving a loop at the top.

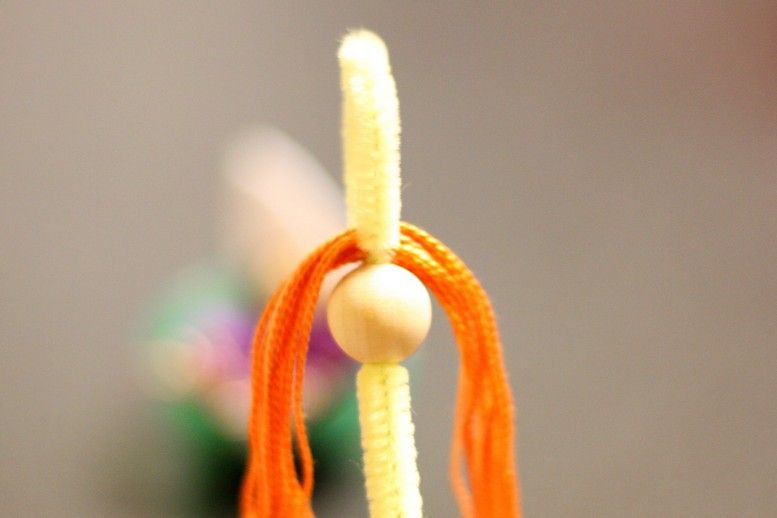
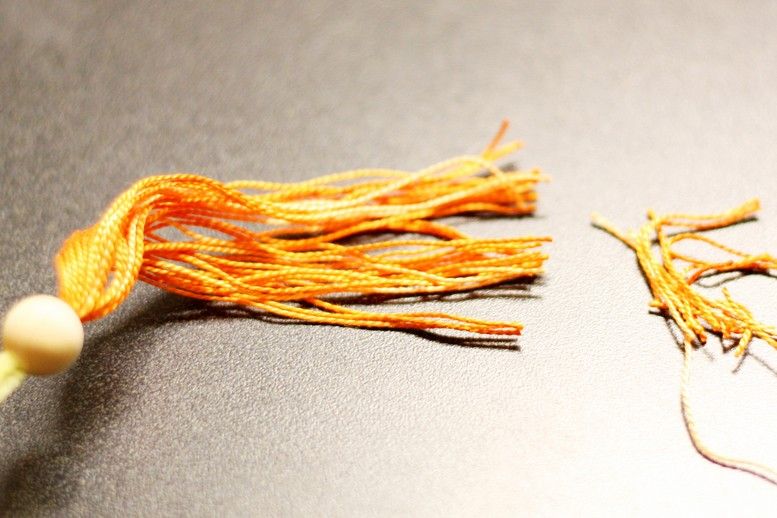
Use the needlepoint thread for the fairy's hair.
Fold a long piece in half over and over until it is around 6 to 7 inches long.
I came across these Pipe Cleaner Dolls and Little Sister Handmade's peg Little Fairy Tutorial.
I incorporated both ideas to make my posable tiny little fairy dolls that are small enough to fit into those gumball capsules I bought from Variation.
Emily's (Little Sister Handmade) tutorial was great!
She shows how to wrap a pipe cleaner to make arms for her cute little peg fairies, and I just used that technique to wrap the fairy's entire body.
I have no idea if I'm doing it the "right" way or not, but it works for me so I'm satisfied!
Emily learned from the book Felt Wee Folk.
How cool! I want that book!
Maybe I can learn even more about making tiny people!
If you're reading this Emily, thank you so much for the link to Felt Wee Folk!
You can get really elaborate with these dolls and embroidery cute designs on their dresses and wings, add buttons, or tiny flowers - the possibilities are endless!
But mine are pretty plain - I'm still trying to get the wrapping technique down pat!
You could probably make one doll in about 30 minutes or so - but once you got the hang of it I'm sure it would take even less time.
POST-IT-NOTE:
My fairies' dresses and wings are based on the one offered by Little Sister Handmade.
I've modified them to fit my tiny dolls.
Materials:
1 6mm pipe cleaner
1 9/16" wooden bead
1 skein embroidery floss (I used #738)
1 skein needlepoint thread (I used size 5 #4124)
paint or paint pens (for the eyes and mouth)
fairy dress and wings template (download here)
needle & white thread
1 piece of felt (for the dress)
1 piece of white glitter felt (for the wings)
hot glue (or felt glue)
Fold the pipe cleaner in half.
Thread the wooden bead on the pipe cleaner, leaving a loop at the top.
Use the needlepoint thread for the fairy's hair.
Fold a long piece in half over and over until it is around 6 to 7 inches long.
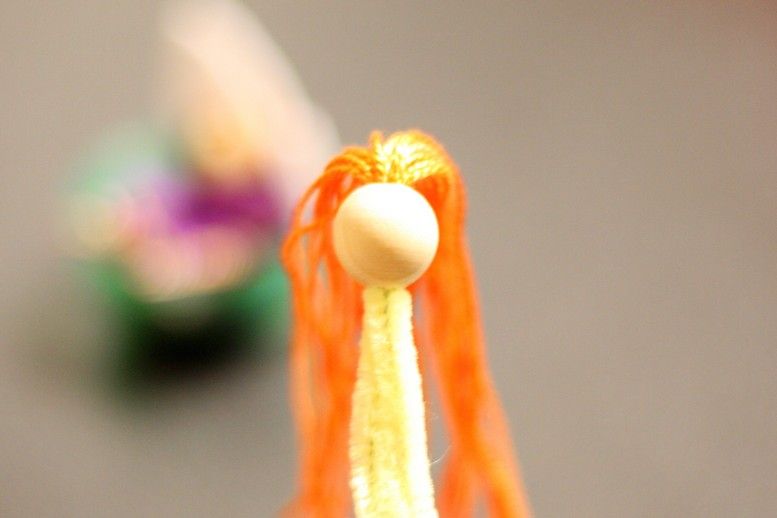
It really just depends how long you want the fairy's hair - my fairies have long hair!
Thread the strand through the loop.

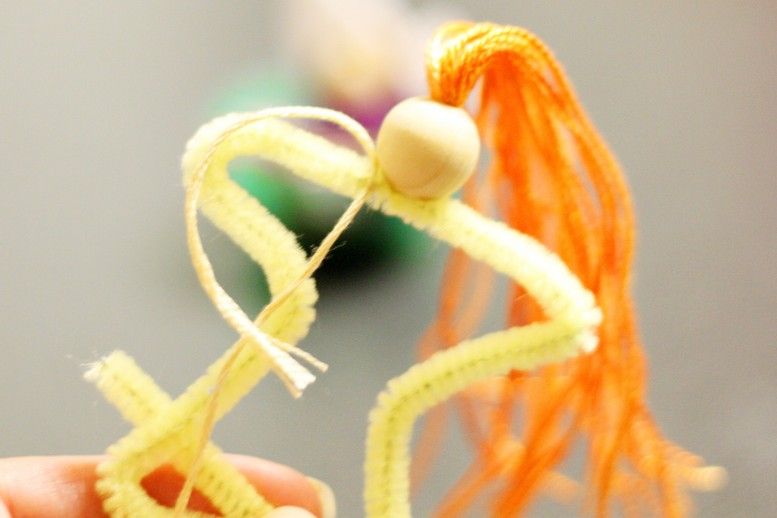
Pull the pipe cleaner down until the hair goes into the bead.

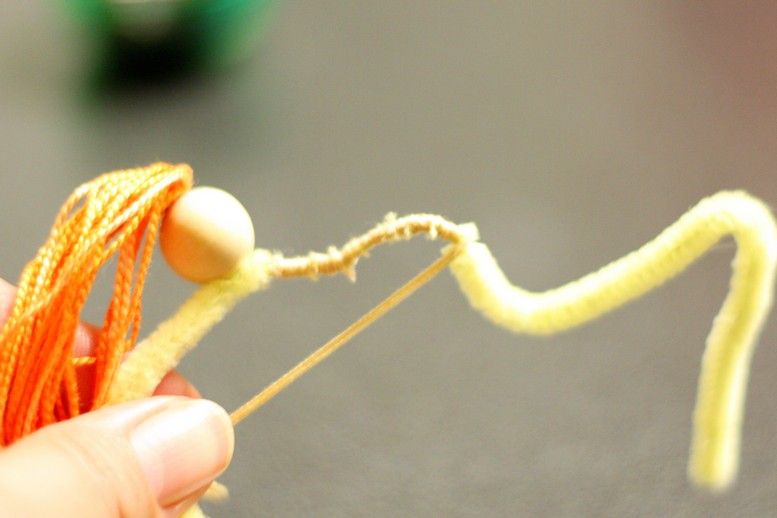
Trim the hair.
You can braid it, put it in a pony tail or add itty bitty beads!

Twist the pipe cleaner near the bead a couple of time to help secure it.

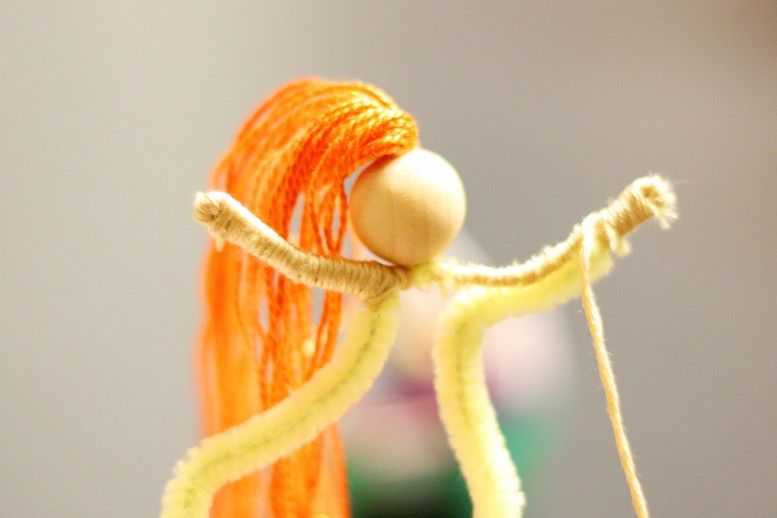
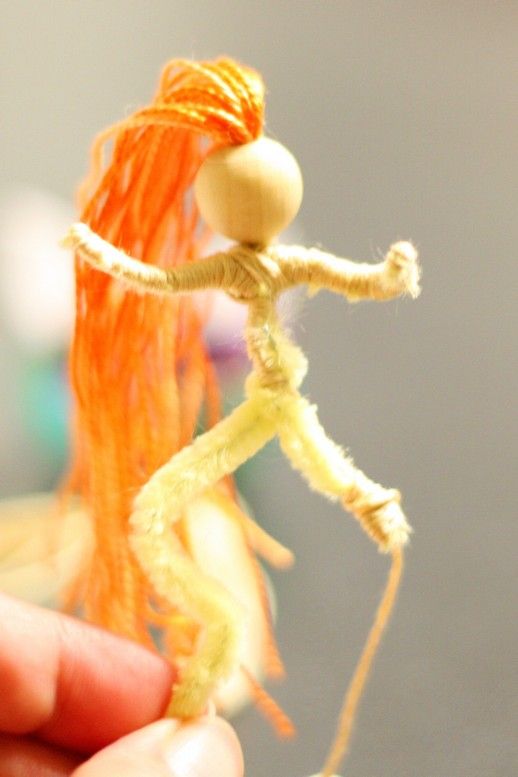
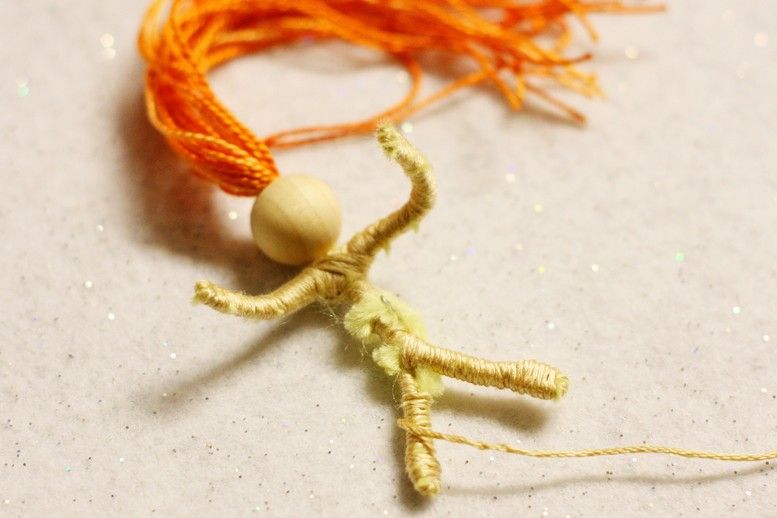
Form the fairy's body.

Tie the embroidery floss (with a single knot) at the "shoulder" near the bead.

Start winding the floss over the shoulder down to the "hand" of the pipe cleaner - try covering it as much as possible.

Once you get to the bend in the hand (thank you Little Sister Handmade for the wrapping tip!), squeeze both pieces of the arm together.
Then wrap both of the pipe cleaner pieces together back to up the "shoulder".
Look at the photos for clarification:

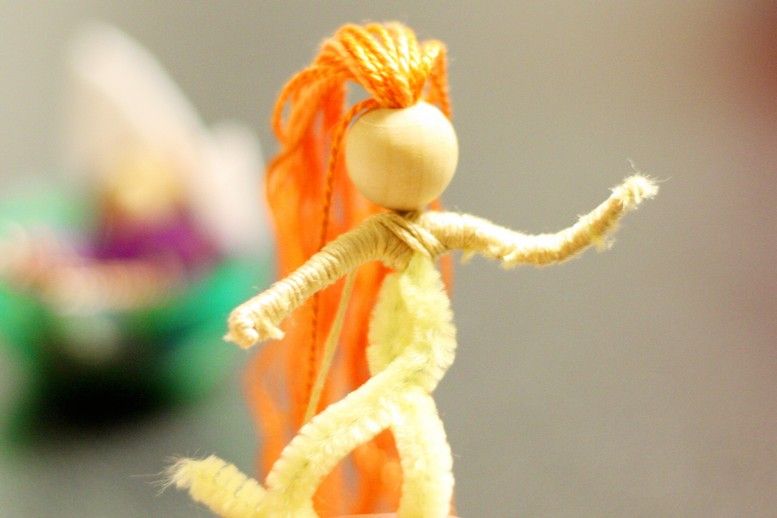
Once you get back near the "head", wrap across to the other side and down to the hand.

And then back up again just like on the last step.

Once you get back to the head, wrap criss-cross over the shoulders.

Now work your way down the waist.

Wrap down the leg until your get to the bend in the foot - just like you did with the hands.

Then fold both pieces of the leg together (wrap any "left-over" pipe cleaner around the waist), and wrap the pipe cleaner back to up to the waist.
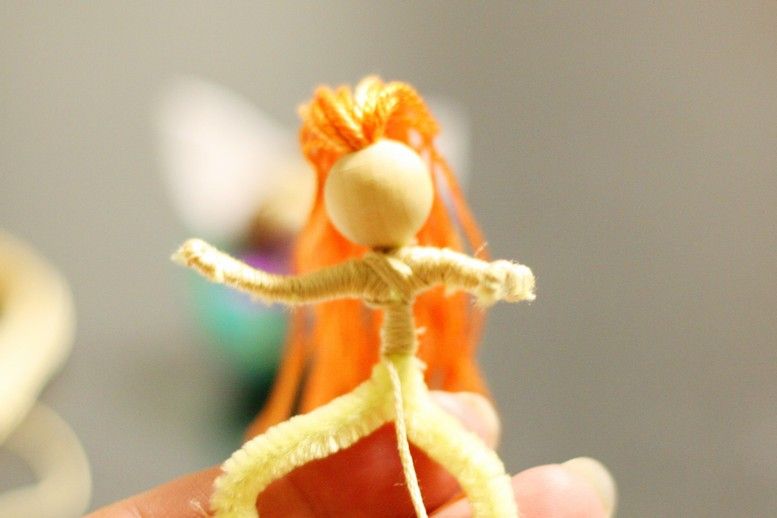
Sorry about the out-of-place photo - I have no idea why I did that!

Wrap across the waist to the other leg and repeat the previous steps until you get back to the waist again.

Work your way up the waist, carefully covering up the rest of the pipe cleaner.
Tie off.
You can see a little bit of the pipe cleaner peeping through my wraps, but I'll get better and Serenity truly doesn't care!

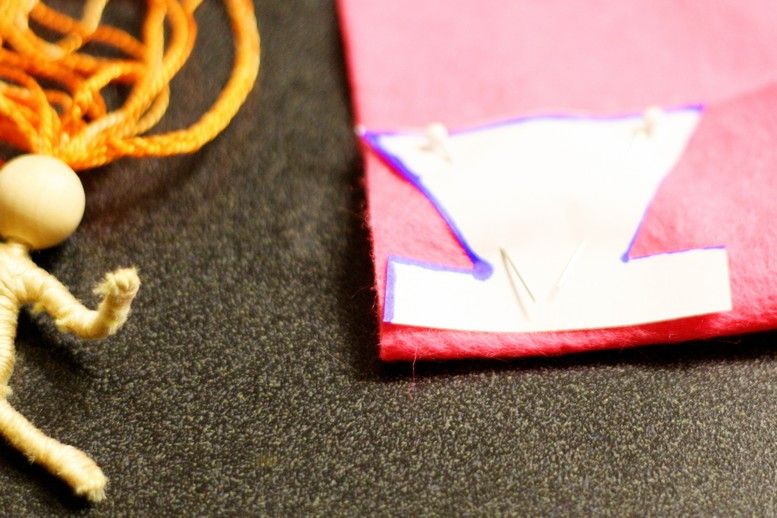
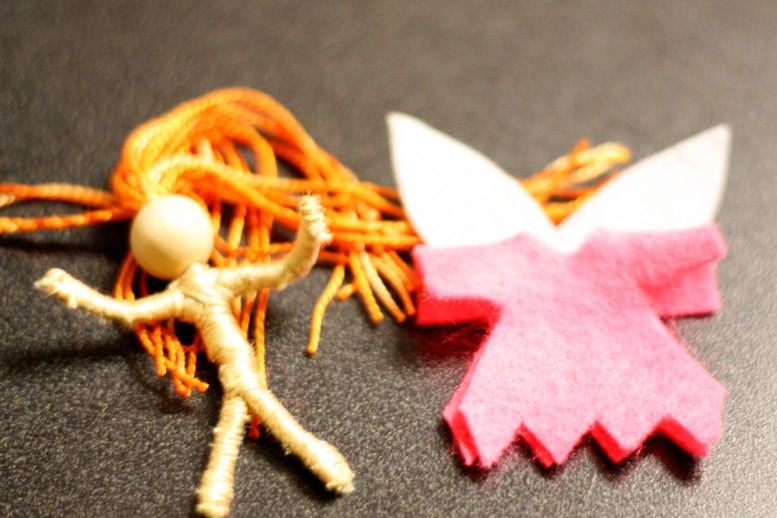
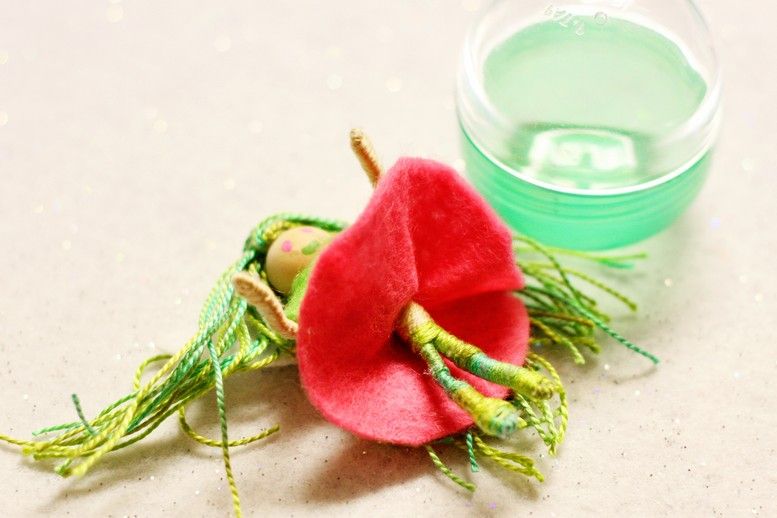
Place the template on a fold, then cut out the dress.

Cut a small hole in the center for the head.

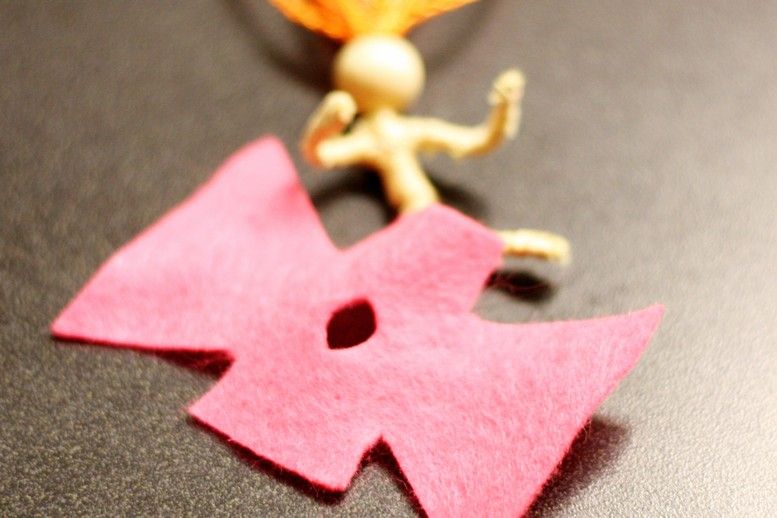
Cut out the wings and a small strip from the glitter felt.
Sew or glue the wings on the dress.

Cut out little points at the bottom.

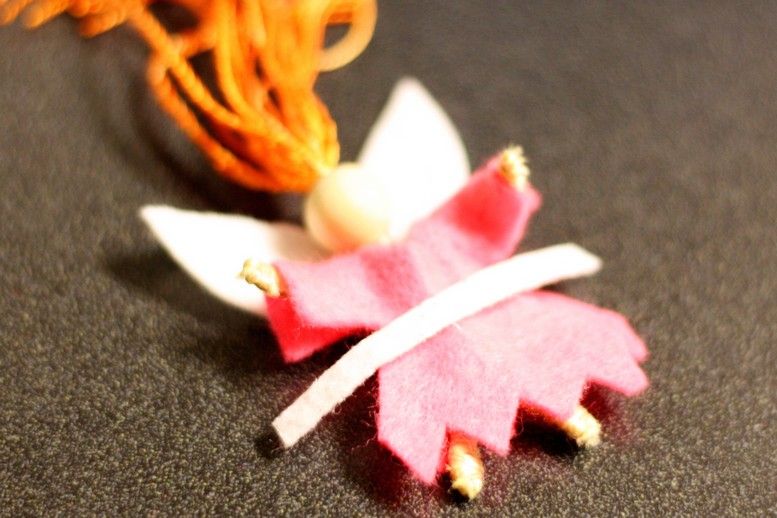
Put the dress on the fairy, then hot glue (or use felt glue) the strip to the dress around the fairy's waist.

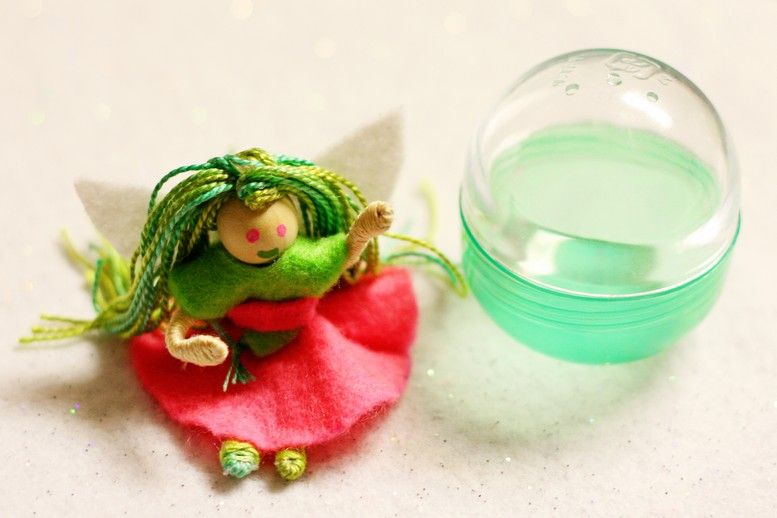
All done!


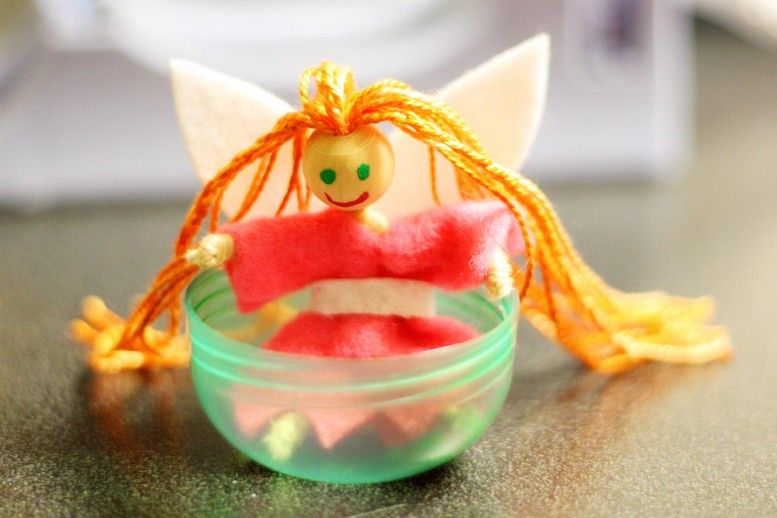
You can paint features on the head or leave it blank. I painted it 'cause when I first showed it to Serenity, she wanted to know where the fairy's eyes, nose and mouth went! For me, using paint pens for the eyes and mouth was a lot easier than using a paint brush. The wooden beads are tiny and I'm not good at painting.
I used one color of embroidery floss for the entire doll, but you can change colors too. Try using different colors for the feet, legs, arms and hands to make them appear as if they are wearing shoes, stockings, and mittens!
So sorry about the pictures too - I realize they are kinda blurry - I was tired and I guess I was trying to do it too fast!
Here's the first fairy I made. I tied a piece of needlepoint thread (the same color as her hair) around her waist. I glued a strip of felt around the waist of the second fairy - I think I like that better than the thread. This fairy is a little smaller than the second fairy too.
Pull the pipe cleaner down until the hair goes into the bead.
Trim the hair.
You can braid it, put it in a pony tail or add itty bitty beads!
Twist the pipe cleaner near the bead a couple of time to help secure it.
Form the fairy's body.

Tie the embroidery floss (with a single knot) at the "shoulder" near the bead.
Start winding the floss over the shoulder down to the "hand" of the pipe cleaner - try covering it as much as possible.
Once you get to the bend in the hand (thank you Little Sister Handmade for the wrapping tip!), squeeze both pieces of the arm together.
Then wrap both of the pipe cleaner pieces together back to up the "shoulder".
Look at the photos for clarification:
Once you get back near the "head", wrap across to the other side and down to the hand.

And then back up again just like on the last step.
Once you get back to the head, wrap criss-cross over the shoulders.
Now work your way down the waist.
Wrap down the leg until your get to the bend in the foot - just like you did with the hands.

Then fold both pieces of the leg together (wrap any "left-over" pipe cleaner around the waist), and wrap the pipe cleaner back to up to the waist.
Sorry about the out-of-place photo - I have no idea why I did that!
Wrap across the waist to the other leg and repeat the previous steps until you get back to the waist again.
Work your way up the waist, carefully covering up the rest of the pipe cleaner.
Tie off.
You can see a little bit of the pipe cleaner peeping through my wraps, but I'll get better and Serenity truly doesn't care!

Place the template on a fold, then cut out the dress.
Cut a small hole in the center for the head.
Cut out the wings and a small strip from the glitter felt.
Sew or glue the wings on the dress.

Cut out little points at the bottom.
Put the dress on the fairy, then hot glue (or use felt glue) the strip to the dress around the fairy's waist.
All done!
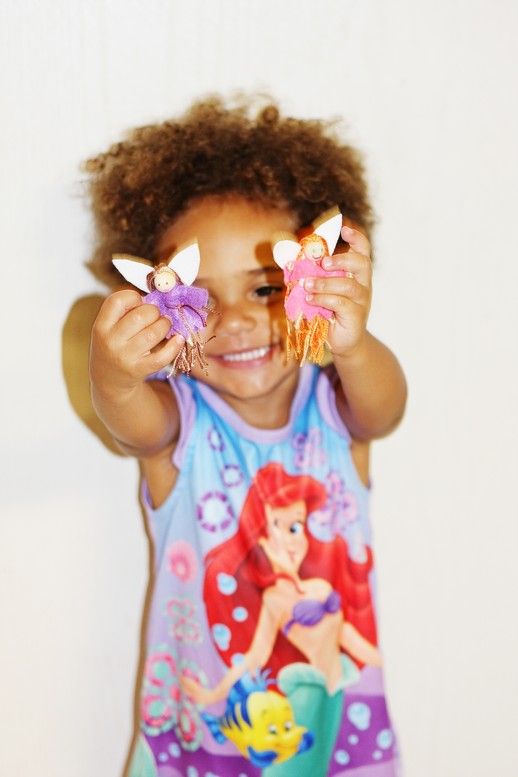
Give it to your Darling Stinker and watch how happy she'll be when she sees her tiny new fairy!
You can paint features on the head or leave it blank. I painted it 'cause when I first showed it to Serenity, she wanted to know where the fairy's eyes, nose and mouth went! For me, using paint pens for the eyes and mouth was a lot easier than using a paint brush. The wooden beads are tiny and I'm not good at painting.
I used one color of embroidery floss for the entire doll, but you can change colors too. Try using different colors for the feet, legs, arms and hands to make them appear as if they are wearing shoes, stockings, and mittens!
So sorry about the pictures too - I realize they are kinda blurry - I was tired and I guess I was trying to do it too fast!
Here's the first fairy I made. I tied a piece of needlepoint thread (the same color as her hair) around her waist. I glued a strip of felt around the waist of the second fairy - I think I like that better than the thread. This fairy is a little smaller than the second fairy too.
Cost Breakdown:
100 pk of 6mm chenille pipe cleaners: $3.29
9"x12" felt squares: .29¢ a piece
pack of 12 9/16" wooden beads: $1.19
embroidery floss: .35¢/skein
needlepoint thread: $2.54/skein
UPDATE:
Here's the third fairy I've made -I'm learning a lot! Serenity wanted her eyes to be pink - looks pretty cool!
I changed her outfit - go here for the the tutu outfit template (Serenity says it's a tutu!).
Cut a tiny hole in the middle of both the top and the skirt - put the top on first then the skirt - go legs first. I used some variegated green embroidery floss for her legs.
Also, when I add the hair, instead of pulling the pipe cleaner loop through the bead, I just made her hair thicker and pulled the pipe cleaner down very tight, then arranged the fairy's hair (using small dots of hot glue) over the bit of pipe cleaner showing on top of her head.
I hot glued the wings too - faster and easier than sewing.

Secure the tutu outfit using hot glue too.
I like this way better than the first fairy outfit I made.
UPDATE 2:
Another good website that shows you how to wrap tiny fairies using embroidery floss can be found here. They also use silk flowers to dress the dolls - adorable!
Also, sometimes the paint runs when I paint the eyes and mouth on the little wooden beads.
I found a cute and extremely helpful Spool Doll tute that explains how to seal the wooden beads before painting the features.
It works!
I used a thin coat of Poly-acrylic and now I don't have a problem with the paint running.
Wouldn't this cute little fairy felt tree house from 5 Orange Potatoes be perfect for all those fairies?!
I'm really starting to get the hang of creating fairies and I'm having lots of fun too.
Serenity never gets tired of seeing each new fairy!
Here's a picture of my latest ones:

I would like give a HUGE thank you to One Pretty Thing and 10marifet.org for linking this post and some of my other ones as well!
UPDATE 3:
Check out pictures of Serenity wearing her Fairy Catcher here!
Have fun!


15 comments:
I think that I will have to make some of these. Too cute. I love your interpretation of the fairies.
These are so cute! I love your tutu wraps too! Good luck on your etsy shop. With your beautiful daughter modeling everything, you should sell a million!!! My husband is from Lafayette.
SUPER adorable. I love them all!!!
Linked to this one as well - love it, love it, love it!
These are super cute! Your daughter is *adorable* too. She looks so happy with your creations!
These are ADORABLE! My daughter would love them, too. We made "fairy bread" today--Here's a link to my post about it:
http://www.sillyeaglebooks.com/2010/01/how-to-make-fairy-bread.html
Oh my, these are sooo cute. The perfect little gift for a b'day party. Must bookmark this project. Thanks for the tutorial!
ADORABLE!!! I cannot believe how cute this is!!
This is so darned cute, I'll have to share this with my girls.
Well aren't you just the most clever. I love this and my girls will too. Thanks for sharing.
Cha Cha
How sweet is your daughter?! So precious.
And that little fairy project is just as sweet as she. My daughter is much to grown up(she thinks) for fairies(even though she really does actually still love them). But if she still loved themI(which she does), I'd be inclined to leave this blog page up for her to see, so she could make one too(which I will).
Nice, detailed instructions and pictures! Thanks for sharing!
I plan to pass this on to my friend Sharon who makes Fairy Doll Houses and my other Waldorf mamma friends!
http://sono-ma.blogspot.com/2009/11/walking-in-winter-wonder-faire-join.html
this is supercute!!! I love it...
I'm throwing a fairy party for my daughter turning two and wanted a tiny fairy doll for each of the girls coming. This was the first post I found on it and it is EXACTLY what I was hoping to find! Thank you for such a thorough tutorial and list of resources. I'm so excited to make these and let the girls glue on decorations. I'm also very glad that I have a month to get it ready!
Thanks!
You are a genius! I love the bug catcher/fairy catcher idea and the little fairy dolls are adorable. I'm going to make some tiny super heroes for my son thanks to your awesome tutorial. I can't wait to visit your etsy shop too. I have been glued to reading your blog since I stumbled upon it. Love the tutu tutorial also! Can't wait to see what I can learn here next!
Post a Comment