Hello Treasure for Tots Readers! I am so excited to be blog swapping with Angie today... she had the CUTEST stuff for little ones- right!?!
Let me introduce myself! I am Fawnda from Fireflies and Jellybeans a little DIY blog that I co-author with my best friend Jeannine.
I am a mom to a 2 year old son (Who is the joy of my life!) I am a part time math tutor for High School math and I LOVE to create!
I love sewing, paper crafts, re-purposing and generally anything crafty!
I love to take on a new project and share my knowledge with others!
Today I have a cute project for you. A cute little apron and cookies for your little baker!

Here is what you will need:
A place mat
Ribbon
A water soluble pencil
Sewing machine (with sewing tools such as scissors, thread, pins etc...)
A place mat
Ribbon
A water soluble pencil
Sewing machine (with sewing tools such as scissors, thread, pins etc...)
 1.) Fold the top corners down on the WRONG side of the place mat and pin.
 2.) sew a 1 to 1 1/2 inch seam on the folder side of the corner. You are making a casing for your ribbon. Repeat on the other corner
3.) Flip the place mat over to the RIGHT side and fold up the bottom edge about 4 inches and pin. (I sewed ribbon on the bottom edge -the back side so that when I folded it up you could see it)
 4.) With a water soluble pencil (or something washable) make vertical lines at 2 inches, 4 inches, 8 inches and 10 inches. This is to make our pocket with little slots to hold our utensils. (click on the picture to see it better.)
5.) Top sew your pocket on the edges and on the lines that you marked.
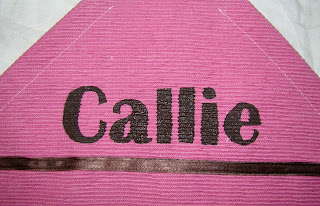
 I also sewed ribbon across the top part of the apron for a little extra decoration... this is optional!
 6.) Cut your ribbon long enough to go over the head and be able to tie about the back, I cut mine about 4.5 feet. Attach a safety pin to one of the ends
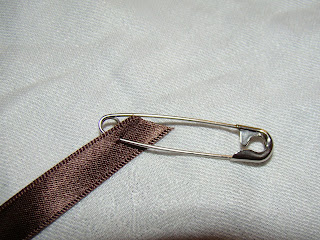 7.) feed the safety pin into your casing.
 up and out of the top and back down the other side.
 Fill it with some baking utensils and you have a CUUUUUTE gift! Use Bryssy's Freezer Paper Stencil tutorial to personalize it!
Want to make some Cookies to go along with it?
 Here is what you will need:
Felt (cream, light brown, dark brown, pink and red)
Needle and thread
Stuffing
Sewing machine (optional)
1.) Cut your felt. Cut the cookie shapes (the great thing about most cookies is that they are not perfectly round!) You need 2 pieces for the cookie. The frosting is just a waving blob - you only need one piece for that. and the chocolate chips are just little rectangles.

2.) Hand sew on the chips and the frosting to one side of your cookie.

3.) Place cookie pieces RIGHT sides together and sew around the edge leaving a 1-2 inch opening to turn right-side-out and stuff.

4.) Flip your cookie right-side-out and stuff and top sew the opening closed.
 You could also hand sew around the edge if you prefer that! I used a blanket stitch...I learned how to make the blanket stitch from YouTube. I just typed in "blanket stitch" in to the search line and got a ton of videos... you can learn anything on the Internet!
 Serve them up on a cookie sheet!
 It would be SUPER cute to cut your cookies in heart shapes for Valentines day!
Be sure to stop by Fireflies and JellyBeans for some fun ideas!
Thanks Angie for letting invade your blog today! It was so fun!












3 comments:
VERY CUTE! Love the apron! I'll have to try it :) It would make a great gift too!
Angie, your blog is so sweet! thanks so much for swapping with me and for sharing your AMAZING felt lasagna with me! It is so cute!
Keep on posting such themes. I like to read blogs like this. Just add some pics :)
Post a Comment