Saturday, June 20, 2009

Vintage Baby

I recently purchased Frog Legs and Ponytails' Caroline Dress PDF pattern for only $9.99.The pattern includes sizes 0-8 and a matching doll pattern! It's a beautiful dress and the instructions are very clear and detailed with a few helpful tips too. You can tell a lot of time and effort went into the making of this pattern.

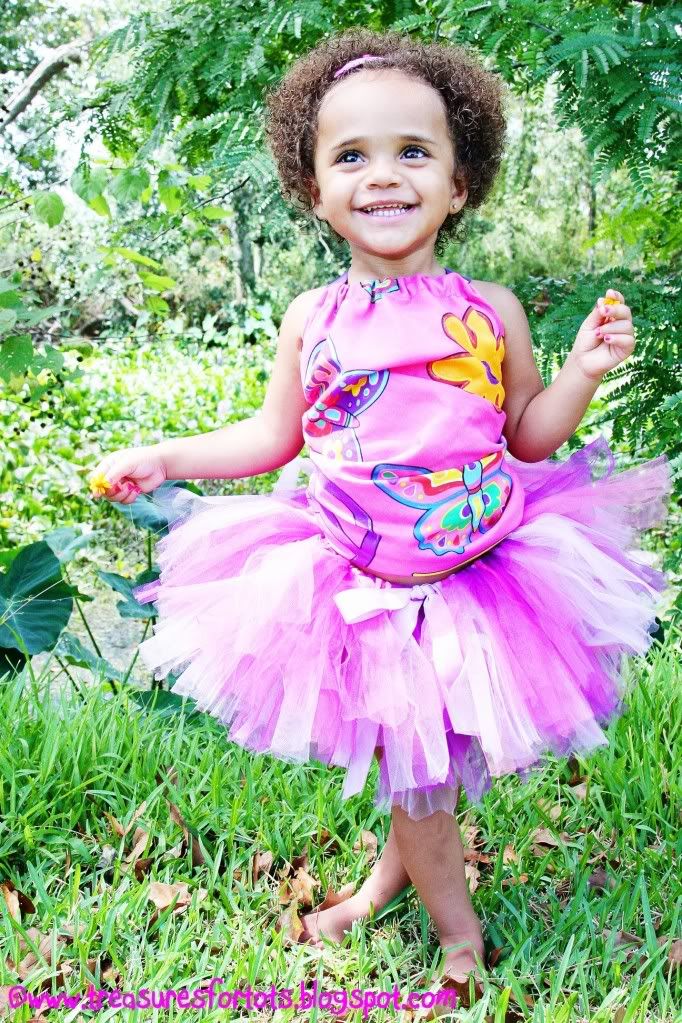
Using the Caroline Dress pattern and inspired by ZoZoBugBaby's beautiful Karaleigh Dress, I made a lovely dress for Serenity last night. The Karaleigh Dress is similar to the Caroline Dress, but it has a gorgeous double ruffle at the bottom instead of a band. It's so girly and twirly! Both of the dresses are kinda like "pillowcase"dresses, but so much more charming! I am totally impressed at the wonderful fabric combinations Julie comes up with when she designs her clothes!

Stunning!

While my fabric combo isn't nearly as striking as Julie's, I think I did a pretty good job sewing my first "pillowcase" dress! I played around in Photoshop again using Pioneer Woman's free action sets: 1 & 2 and got these cool vintagey type results:


Please ignore the dog hair all over Serenity's dress! Gizmo (or Gizzy Mo!), my Japanese Chin, sheds like crazy and his longs white hairs really showed up on that black & while polka dot ruffle fabric!


If you're looking for a beautiful Summery dress, get ZoZoBugBaby's Karaleigh Dress for your DD - it's a fabulous piece of wearable art!

POST-IT NOTE: ZoZoBugBaby's $10 skirt sale starts tomorrow at 8AM PST (or 10AM CST). Plan to hit her store during that time! Hurry and place your orders quick! Last time Julie's skirts went on sale, they sold within 3 minutes of posting!! I'm hoping I can grab a couple for Serenity before she sells out!! And don't for get to check out the ZoZoBugBaby blog for all of Julie's latest updates!

The Frog Legs and Ponytails' Caroline Dress PDF pattern was worth every penny too! If you're looking for an "uptown & classy" pillowcase dress pattern, then this pattern is the one to buy!

Have fun sewing!

StumbleUpon.com

Friday, June 19, 2009

Photoshop Actions

What are Photoshop Actions?

"An action is a series of tasks that you play back on a single file or a batch of files - menu commands, palette options, tool actions, and so on. You can create an action that changes the size of an image, applies a filter to the image for a particular effect, and then saves the file in the desired format. Nice, isn’t it ! Actions can include stops that let you perform tasks that cannot be recorded (for example, using a painting tool). Photoshop and Illustrator come with predefined actions installed that help you perform common tasks. You can use these actions as is, customize them to meet your needs, or create new actions. Actions are stored in sets to help you organize them. You can record, edit, customize, and batch-process actions, and you can manage groups of actions by working with action sets."


I recently discovered Photoshop actions and I can't get enough!! I've always wondered how to get those beautiful color-saturated "professional" looking pictures. People have told me I take pretty good pictures, but to me, they seemed kinda washed out, compared to how I wanted them to look. So I did some research on the net, and finally figured out why my pictures didn't look the way I really wanted them to and how to make them to look that way!

I've said it before, but it bears repeating over and over: I LOVE the internet!! So much information!!! It's like having a giant book that never ends! Ooops! Did my geekyness just show? Lol!

Okay, I'll stop drooling and continue...

I've been playing around with Photoshop using some free actions I've found on the internet and getting some amazing results. I mentioned in an earlier post about Pioneer Woman's free action sets: 1 & 2; I recommend you download and try them out today! You can find lots more free Photoshop actions all over the net. DeviantART and Visual-Blast have free actions to download too. Also, try Googling "free photoshop actions", and you'll get around 6,500,000 hits!

Wow!

If you have a particular set of techniques you use over and over, you may be interested in learning how to make your own Photoshop actions. You can find thousands of tutorials all over the internet. I used this tutorial to create an action to add my watermark to all of my pictures. Since learning the technique, I've made several different watermark actions; I don't always use the same one. It was a very easy technique to learn.

Scrapbook magazines offer great photography tips too. I recently bought a magazine by Scrapbooks, etc. that is filled with tips and tricks. You can visit their website for even more photography help.

Here's a couple of pictures I took of Serenity today that I tweaked in Photoshop using several actions I found on the internet.

Check out these awesome results:


The original picture, straight from my camera, is on the left. The picture on the right has been Photoshopped.


Both of these have been Photoshopped.


The original picture, straight from my camera, is on the left. The picture on the right has been Photoshopped.

Both of these have been Photoshopped.

Pretty neat, huh?! Photoshop actions will make your pictures POP! The key is practice, practice, practice! To get the results above, I mixed around 7 different actions together - more is better!

Yep! Serenity's wearing her one-of-a-kind dress from courtneycourtney - don't forget to check out Courtney's store on Etsy and get your DD one of her beautiful dresses today!!

Have fun!

StumbleUpon.com

Thursday, June 18, 2009

Round Neck Sundress by That Darn Kat

Last night I tried That Darn Kat's Round Neck Top/Sundress pattern ($9.95) for the first time. You can find it at YCMT.com. I ended up adding a rolled hemmed ruffle at the bottom of the dress instead of the band to change the look of it a tad bit. I'm so pleased with the results!

Next time I might sew a longer dress with a ruffle to see how that'll turn out, but I had specific look in mind that I wanted to try. I was wondering how it would look if Serenity wore a pair of knee length leggings ($3.99 at Target) with a short ruffled round neck sundress. Well, I think it turned out to be a really cute Summer outfit!

Whaddya think?


I used Heather Bailey's beautiful and bright Pop Garden Paisley Lime and Pink Peonies fabrics. You should be able to find it at your local quilt shop, or on Ebay like I did. Etsy has sellers with excellent fabrics too! Anthem Fabrics, Sew Love Fabrics, Aliyah's Hope Chest, Fabric Bee, and Marie-Madeline Studio all have a wonderful, large selection of beautiful fabrics.

That Darn Kat's Round Neck Top/Sundress pattern is a fairly easy project to sew. It'll be a breeze for intermediate sewers, but a beginner shouldn't have a problem either. The pattern has extremely detailed instructions with lots of helpful step by step photos. Just make sure to take your time and read all the instructions carefully. You'll be very happy with your results if you do!

Have fun sewing!

StumbleUpon.com

Tuesday, June 16, 2009

Caramel Iced Coffee


Caramel Iced Coffee:

2 ounces coffee concentrate
1 cup milk
Smucker's Caramel (or Chocolate) Sundae Syrup
Ice

Mix the concentrate and milk together, then stir in a couple/few squirts of caramel syrup and add some ice cubes.

Enjoy!
-------------------------------------

I've made a second batch of cold-brew coffee concentrate and I think I got the water/coffee ratio right this time.

I used Community Coffee's Kenya whole bean coffee (12oz); it's a medium-dark roast from their Private Reserve collection, but it's only available for a limited time. I used
Rouses grinder, on the "coarse" setting, to grind the beans so I didn't have to do it at home - a good tip I found from a reviewer on Amazon.com. Rouses doesn't charge you extra to grind the beans either - nice. Only grind your beans at the grocery store if you're planning on using the coffee grounds right away! Fresh is better!

I also tried another tip from a reviewer on Amazon.com and reused the coffee grounds.

Okay, so here's what I did this go 'round:

1. Insert the plug to the outside bottom of the plastic container.
2. Make sure the filter is very wet, then put it in the inside bottom of the plastic container.
3. Pour 2 cups water into plastic container.
4. Add all 12 ounces of the coarse ground coffee beans.
5. In a gentle circular motion pour 2 cups of water.
6. Wait 5 minutes and pour 2 more cups of water. Press any grounds down with the back of a spoon - try not to stir.
8. Wait 14 hours.
9. Pull the plug while holding the plastic container over the glass decanter.
10. Put the plug back into the plastic container.
11. Add 4 more cups of water - don't stir! Use your spoon to tap the grounds down.
12. Wait 10 hours.
13. Pull the plug while holding the plastic container over the glass decanter.
14. It fills the glass decanter almost to the top - about 7 cups (56 ounces). The rest of the water is soaked up by the grounds. Don't squeeze the water out of the grounds!

The result is a much stronger coffee concentrate, but it's still very smooth and not bitter. I use 2 ounces coffee concentrate to make an 8 ounce cup of coffee, it tastes delicious and smells wonderful!

It makes a delicious iced coffee too.


Have fun!

StumbleUpon.com

Sunday, June 7, 2009

Sarah's Glamorous Photo Shoot

Yesterday, I took Sarah out & about for her very own "glamorous photo shoot" - just like Kelsey. She was a very good model and her pictures turned out magnificent! Here are some of the results:


These were taken at St. Martin's. I love bright colors and how Sarah is posing in both these shots.


The one on left is at St. Martin's. It looks like she's floating. I think it's her "Angel" picture. I intentionally blurred the edges around Sarah to give the shot a more "afterlife" effect. The one on the right is near Uptown in Houma. I enhanced every bit of blue in this shot, and I'm so pleased how it turned out. Sarah's outfit appears blue, but she's actually wearing a grey shirt - not blue! I love the way that gorgeous deep blue looks against the beautiful old red brick, the effect is quite striking! I also "airbrushed" Sarah's name on the wall - neat, huh? I had to take a crash mini-course online to learn how to do that!


Taken at St. Martin's. Unquestionably stunning. I really like her outfit too, she looks like a throw-back to the 80's! The big shirt/legging style is coming back. Oh my!


Taken at St. Martin's. These poses are very whimsical. Sarah was such a splendid model.


Taken at the Railroad tracks in Thibodaux. The first one is cute and funny - look at that smile! The second one looks like Sarah's punk rock album cover! Dude, she's so cool!


The top one was near the Intracoastal Canal. I enhanced all the blue in this photo. I absolutely LOVE the results! the bottom one was at the railroad tracks in Thibodaux. Look at her sassy little bow smile!!


Taken at St. Martin's. The one on the top is Sarah's favorite. I like the angle too, I was able to get the gazebo, the bayou, and a beautiful smile from Sarah all in the same shot. As for the picture on the bottom, I gave this one a "soft" look to achieve that "ghostly" effect. We were on the grounds of a very old house, so I needed at least one "spooky" shot!


Hope you enjoyed the new pics! Thanks for stopping by!

StumbleUpon.com

Saturday, June 6, 2009

Adorable Crochet Skirts

I crocheted two skirts for Serenity using the cutest pattern I bought over at Dutch Knitting Design for only $7! The pattern is extremely detailed with lots of helpful information and tips. The skirts were very easy to make, and taking my time, it only took a couple of hours to complete a size 2 skirt.

On Wednesday I made the first skirt. The colors remind me of sherbet so that's what I'm gonna call it! Here's Serenity wearing her "Sherbet Skirt":

I got so many compliments; everyone wanted to know where I bought it!

For the second skirt, I was inspired by Alice over at futuregir!.com.

BTW: Check out her new post: Tutorial: Foundation Single Crochet - Supplement. It's a follow-up for her Foundation Single Crochet Tutorial.

She made one of her beautiful handbags for a friend that was blue with a couple of darling felt daisies. Alice even has an easy picture tutorial showing you step-by-step how she made the those little daisies! What a sweet look for a toddler skirt! So Thursday night I whipped up another skirt:


LOVE it! She even has a pair of daisy shoes to match! Everyone kept going on and on about how pretty Serenity was wearing her "Sweet As A Daisy Skirt"!

Of course I plan to make more of these! My next projects will be two skirts for the 4th of July. I'm making one for Serenity and one for my friend's little girl, Cobee Lynn. I'll try to get pictures of both of the girls together wearing their outfits and post 'em! Cobee Lynn is adorable and I've got to get some pictures of her wearing at least one of the outfits I made her!!

It's inexpensive to crochet too. I only used around 2 skeins of Sugar 'n Cream cotton yarn. It's kinda more expensive than worsted yarn, but you can pretty much use whatever yarn you want to change the look of the skirt. My costs for the yarn was about $1.89 per skein. If you need to make a larger sized skirt for a tween or older, using cotton yarn can get very expensive. I'd use worsted or sport yarn for a bigger skirt since it'll keep costs cheap.

For the sweetest little crochet skirt pattern, go check out Dutch Knitting Design. They have lots of other patterns that you might be interested in too!

POST-IT NOTE: Even though I've been crocheting for years, I still find the need to clarify some little (or huge) technique or have a question I need help answering. At Micheal's a few months ago, I came across probably the smallest, most helpful crochet handbook I've ever seen. It's called The Crochet Answer Book ($10.15 & free shipping w/Amazon Prime). GET IT! It'll be the best little crochet book you'll ever buy!

Have fun crocheting your next project!

StumbleUpon.com

Wednesday, June 3, 2009

Handmade Crochet Stitch Markers

Right now I'm crocheting a skirt for Serenity using a pattern I found on Etsy by Dutch Knitting Design. After ripping out my work twice, I realized I needed something to keep track of my chains, 1st. stitch, rows, right side, and all that other crochet stuff. Hmmm... think, think, think - I know (as Serenity would say)! Stitch markers! I remember reading how Alice over at furturgir!.com, used a ton of markers when creating her beautiful handbags. In fact, she even has a "paper clip stitch markers" tutorial posted on her blog. Cheap & incredibly useful! I never needed stitch markers when I was younger; I just kinda winged it. They would be very handy to have now though!

So I did a quick Google search "make crochet stitch markers" for some more ideas, and got 132,ooo hits. I liked Alice's tutorial too, but I didn't have paper clips last night, so I improvised. I used a safety pen, and I broke apart a old beaded necklace (that I don't think I've ever worn), and made my own stitch marker. I use the beads and clasps from the necklace, and a small piece of embroidery floss. It's cute, but I think I need just a few more to really mark my project - and future projects.

Since all my bracelet making stuff is in storage (and no way I'm digging through all
that by myself!), I stopped at Michael's (Wal-Mart has a pretty okay selection of beads and findings too) today and picked up some beads, jump rings, pins w/rhinestones, lobster claps, and mini needle nose pliers:

I used one big bead and two small ones, a lobster clasp, jump ring, and pin to make each marker:

Here are my markers. I made the one the far right from the old necklace.

Here's a picture of the markers attached to Serenity skirt:

BTW: The crochet hook has a flower hand that was handmade from polymer clay. I first saw these pretty (and comfortable to use) hooks over at PlanetJune and followed the link back to The Fanciful Feline on Etsy. For years now, my hands have started to cramp so bad I haven't been able to crochet. I used to make big, beautiful afghans but had to quit because my hands would hurt so bad almost as soon as I'd start crocheting. I just started crocheting again, but only to do quick and easy projects - like halter tops for Serenity, but I had to put down my work often to rest my hands. I made Serenity's skirt using this crochet hook, and it was a HUGE difference. My hands didn't hurt - and only after a long time of crocheting did they even ache, but that's perfectly normal! I probably should've invested in some kind of cushion a long time ago. The hooks at The Fanciful Feline are not only beautiful, but very comfortable to use too! Go check 'em out today.

Anyhoo...

I like the way my markers came out - I'll probably make more soon. I think I would like a few more using embroidery floss. The beaded floss marker is much more flexible than the wire markers; plus it's very light!

If you want to make your own, use any type of beads, wire, embroidery floss, earring hooks, leverback clasps, lobster clasps, or whatever you want. You can make them very cheap & cute
or expensive & exquisite (having fun wit da words). It's totally up to your budget and imagination!

While at Michael's, I almost bought a Super Style Kit - the pink one. It has everything you need to start making all kinds of different jewelry - for only around $25. Not too bad. But those red beads caught my eye first and I couldn't resist! Michael's had a few other interesting kits you might want to have a gander at too!

UPDATE - While on youtube today, I found some videos of how to make stitch markers that you might find helpful. Go check 'em out! A good place for wholesale beads, findings, clasps, and tons more, go to Fire Mountain Gems and Beads. I found this excellent online site years ago when I used to make bracelets. They sell all kinds of jewelry making stuff - you'll spend hours exploring their website!

Have fun!

StumbleUpon.com

Tuesday, June 2, 2009

Serenity's Dress Recon From A Man's Button Shirt!

I found a really neat & free tutorial on Craftster a while back and finally got around to trying it out tonight.

Cheytown submitted a unique and very helpful picture tutorial that shows you how to deconstruct a man's button shirt, and then reconstruct it into the cutest little toddler sundress. I bookmarked the site and kept telling myself I would find time to make this dress - someday!

Since my husband would never willingly buy, much less wear a button shirt, I picked up a couple of men's long-sleeve button shirts at Goodwill for only $2.99 each over a week ago. I was sick all last week and didn't get to do any projects. I was feeling somewhat better today, so figured I could handle sewing this very easy dress.

I love the results! Serenity likes her new dress too! Here she is wearing it and posing so pretty for me:


After having a little fun playing around with Pioneer Woman's Action Set 1 and Set 2 (both are free) for Photoshop, I got these beautiful results (simply by clicking one button):


Pretty neat, huh? Don't 'cha want to go check out Pioneer Woman's blog now? Ree has her hands full! She lives on a real, honest to gosh ranch, does cooking, photography, gardening, homeschooling AND finds time to create an awesome blog! I'm so impressed and awed by her!

Now back to the pattern! I did some things slightly different than the tutorial, but it's so easy to make you can customize however you want with no problem. I love the little ruffle straps on this dress! Aren't they adorable?

I also found a pattern on Etsy for another style dress using a man's button shirt. It's a PDF pattern called the Poppy Halter Shirt Dress ($8.50) by Lavender Kitty. Pretty! I bought the second shirt at Goodwill to make this dress too. I'll post some pictures when I've finished sewing it.

It's such a cute concept to take one of Daddy's (or Grandpa's) old button shirts and remake it for your little Princess. I've got my eye on my Daddy's wild Hawaiian tropical print shirt I saw him wearing the other day. I think I might snatch it!

UPDATE: Click here for another free tutorial!

Have fun sewing!

StumbleUpon.com

Monday, June 1, 2009

Dresses by courtneycourtney!

Serenity's cute cowboy boots dress by courtneycourtney came in a few days ago and I took Serenity around Houma/Thibodaux to shoot some pictures of her wearing it. Bethany came with us and I shot some pictures of her too. I'll post them later. We went to a few of the same places I took Kelsey.

In these pictures, Serenity's wearing her new cowboy boots dress with the little cap sleeves. The dress was beautiful on the my computer monitor, but my monitor didn't do it enough justice. It looks so much better in person! The colors are gorgeous! I love the way Serenity's pictures turned out! Do you?


Courtney also sent me a sweet little sample dress and I shot some pictures of Serenity wearing that one too. Isn't that band of flowers in the middle of the dress pretty? Serenity certainly noticed! How did Courtney know Serenity was going through a "flower stage"?! Everyone who saw her wearing it remarked how cute it was on her! It's an off the shoulder dress and perfect for our sweltering summers down here in South Louisiana. The dress was just a tad big on her (she's so tiny), but that only means she'll be able to wear it longer.


Courtney's dresses are darling and I have to admit I'm totally addicted. Serenity loves them and she always knows exactly what they are as soon as I open the package. She's ready to put the dress on right away - then go take pictures. It's like a "twirly switch" turns on as soon as she puts on a dress by Courtney too! She spins around and around and around! It makes me dizzy just looking at her.

Courtney's dresses are a piece of unique, cool & comfortable wearable art - and your little girl will LOVE one too! Take a little time to check out Courtney's store and all her latest updates on her blog, you'll be glad you did!

StumbleUpon.com
Related Posts with Thumbnails